
For those of us lucky enough to have recordings on cassette tape with valuable family history information, finding a way to preserve those recordings for future generations can be a challenge. I'm pretty comfortable with technology but it still took me awhile to figure it out, so hopefully what I learned will help someone else.
My first attempt to digitize the cassette tapes passed down from my great aunt was to get an inexpensive karaoke machine at the local Goodwill store that had audio outputs. I had a cable that had a single audio plug on one end and the red/white plugs on the other, so I tried plugging the red/white plugs into the karaoke machine's output and the other end into my computer's microphone jack. The sound quality was distorted and the voices were barely audible. I read that my computer's headphone jack could accommodate input as well as output, so I tried that next but the computer didn't recognize the input.
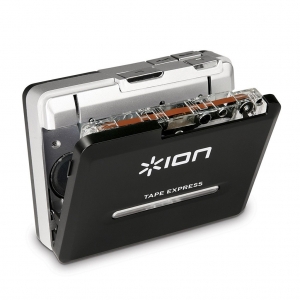
Back to square one, I headed over to the Technology for Genealogy Facebook group for advice. What I learned was that the microphone input couldn't handle the input from the line in and I needed to input via USB. Although I was hoping not to have to spend any additional money, an input device was necessary to capture the audio and input it via the USB port. I looked at several devices and decided to go with the ION Tape Express (affiliate link) a cassette player about the size of a Walkman that comes with both headphones and a USB output with cable.
Most of the reviews said that the software that came with the recorder was poor quality, so I didn't even install it. Instead, I downloaded Audacity audio editing software, which is available for free from SourceForge for Windows, Mac, and Linux. Although the interface looks intimidating, the software is fairly simple to use once you figure it out. I am on an iMac running Yosemite, but the steps I took should be very similar in other operating systems.

Audacity Toolbars
Audacity has several default toolbars, but you will only need the tools labeled above for this process:
- The familiar play, pause, record, stop, etc. buttons (1)
- The selector tool (2), which will be how you select a sample for noise reduction later in the process when you are cleaning up the recording
- The recording meter (3), which shows the level of the input
- The master volume for the input (4)
- The zoom buttons (5)
- The device toolbar input (6) tells Audacity which input to record (make sure that the dropdown list contains the USB PnP - plug 'n play - device, which is your ION Tape Express or whatever USB input you have chosen to use)
Recording With Audacity
Step 1. Download and install Audacity according to the instructions for your operating system.
Step 2. Put the batteries into your ION Tape Express (or make sure whatever device you are using is powered up) and plug your device into the computer using the USB cable.
Step 3. After installing Audacity, open it and choose File/New (your device must already be plugged in when you open Audacity or it will not recognize it as an input).
Step 4. Choose your device from the dropdown menu (6).
Step 5. Play a sample of your tape and be sure that the meter in Audacity is picking up the sound. Also check to be sure that the recording meter shows in the green area and does not include peaks up into the red. If it peaks into the red, turn the master input (4) down until your sample stays out of the red.
Step 6. Record your input by clicking the Play button on your device at the same time you click the record button (red circle) on the Transport toolbar in Audacity (1). Audacity does not automatically stop recording when one side of the tape ends, so you will need to monitor it and stop the recording manually.
Step 7. Save your project (File / Save Project As). This does not save your project in a file usable by anyone else, but it preserves your project while you are working on it until you are ready to export it as an MP3 file.
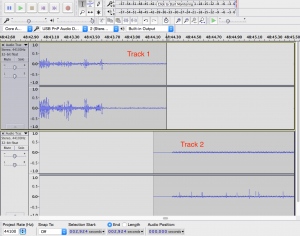
Step 8. If your cassette has a second side, make sure the selector device in the top track is at the end of that recording, flip the tape and repeat Step 6 for the other side. Each recording will create a new track (if you are familiar with graphic editing, you can consider each track like a Layer in a graphics editing program) which will be saved in your Audacity project, but will be flattened into one single recording in your final MP3 export.
Step 9. Save your project (File/Save Project).
Cleaning Up Your Recording with Audacity
Step 1. Play back portions of your recording to get an idea of the sound quality so that you know what needs to be cleaned up. Usually this involves clicking and background noise.
Step 2. If your recording has clicking noises, you can clean those up by double-clicking the entire track (this selects the entire track for editing and you will have to do this for each track) and choosing Effect / Click Removal. Audacity will process the entire track to remove the clicks. Repeat for all tracks.
Step 3. Noise removal requires selecting a sample of the background noise you want to remove and letting Audacity process the sample so it knows what to look for. Do this by using the zoom controls (5) to zoom in on a section of the recording with nothing but the background noise you want to remove. These would be the parts of the track closest to the midline as illustrated below. Use the selector tool to select a portion of the recording with only background noise.
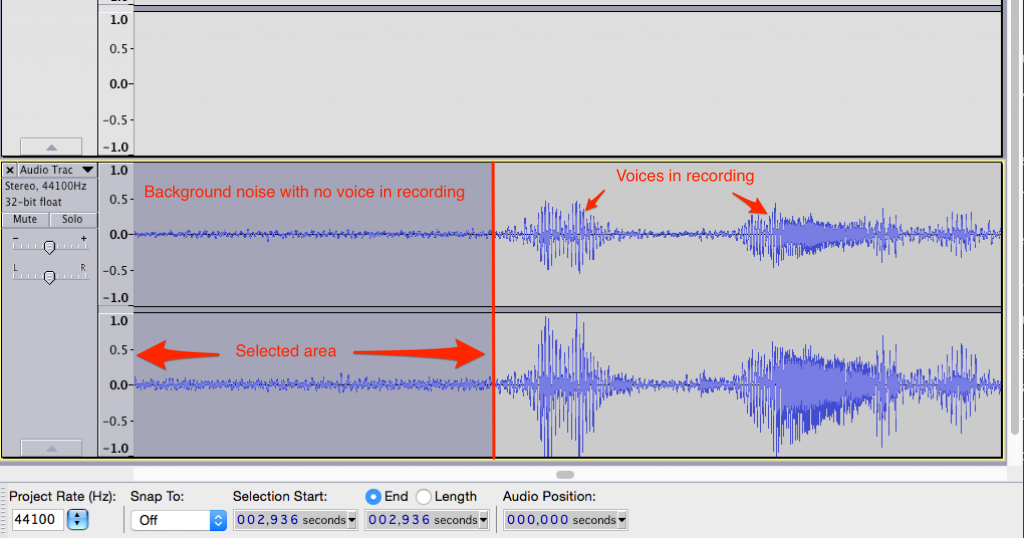
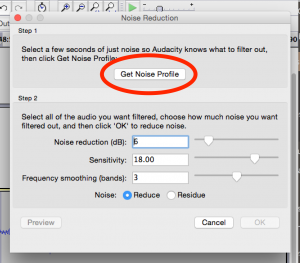 With the selection still highlighted, choose Effect / Noise Reduction. In the popup window, choose Get Noise Profile. Audacity will use the sample to determine what to filter out.
Step 7. Test your noise reduction by selecting a portion of the recording that has voices, then choose Effect / Noise Reduction from the menu. This time click Preview in the lower left corner of the popup window and listen to see if you are happy with the results. If not, try adjusting the sliders for Noise reduction, Sensitivity, and Frequency smoothing until you are happy with the results. Write down the settings that you want to use on the full recording, and click cancel.
Step 8. To apply the noise reduction to the entire recording, double click the first track to select the entire track, then choose Effect / Noise Reduction. Input the settings you choose and click OK. Audacity will process the entire track to remove the background noise.
Step 9. Repeat for each subsequent track.
Step 10. Save your project (File / Save Project).
This YouTube video walks through the process of Noise Reduction in Audacity if you want to see it performed.
Exporting As MP3
Audacity's file format preserves all of the changes you have made, but it doesn't save it in a format that can be played on CDs or MP3 players. For that, you need to choose File / Export Audio. From the dropdown list, choose MP3 as the format and name your file. Save it to the location of your choice.
(Note that if Audacity cannot find the library it needs for converting to MP3, it will give you a popup that asks where it is along with a link to install it. Just click that link and Audacity will install it in the correct folder. Repeat the process to export as MP3 and it should complete now that the library is installed.)


Linda Stufflebean
Thanks for sharing a "how to do" that many of our generation face with outdated technology. This will be on my Recommended Reads on July 10.
Mary Ann
Thanks, Linda! Glad to help. It turned out to be an easy process, for which I was thankful. I have to give credit to the Technology for Genealogy group on Facebook for pointing me in the right direction. I was getting nowhere on my own.
Jana Last
Mary Ann,
I want to let you know that your blog is listed in today's Fab Finds posts at http://janasgenealogyandfamilyhistory.blogspot.com/2015/08/follow-friday-fab-finds-for-august-7.html
Have a great weekend!
Mary Ann
Thanks for the shout out, Jana!
Carolyn Swiss
Just found your blog. Love it!
How do I sign up to get email notices of your blog posts?
Thx.
Mary Ann
Hi Carolyn - You can sign up for our newsletter (published every 2 months with updates and genealogy-related links) at http://www.collectingcousins.com/subscribe-to-our-feed/ or our feed (you can add it to your favorite feed reader) at http://www.collectingcousins.com/feed/.
Linda
Can I delete parts of a family conversation cassette taken since in just do not need/want some of it saved for future generations?
Mary Ann
Hi Linda — Yes, Audacity is a robust editing tool with the ability to edit audio files a couple of ways. I do not have a tutorial on how to do that, but Audacity has help files, and I also saw a brief video tutorial in the search results. I'm sure there are more available if you search for "cropping files in audacity" or a similar term.